Classification with Extraction#
Categorization and extraction of documents in one project#
With Konfuzio it is possible to categorize documents in a project with the help of a categorization model and to apply individual extraction models for each document category based on this. In this article, you will learn how to create such a project and how to set up the categorization and extraction. We will show you the principle using an example project in which we will first categorize and then extract pay slips and invoices.
The concept of the example project (Figure 1):
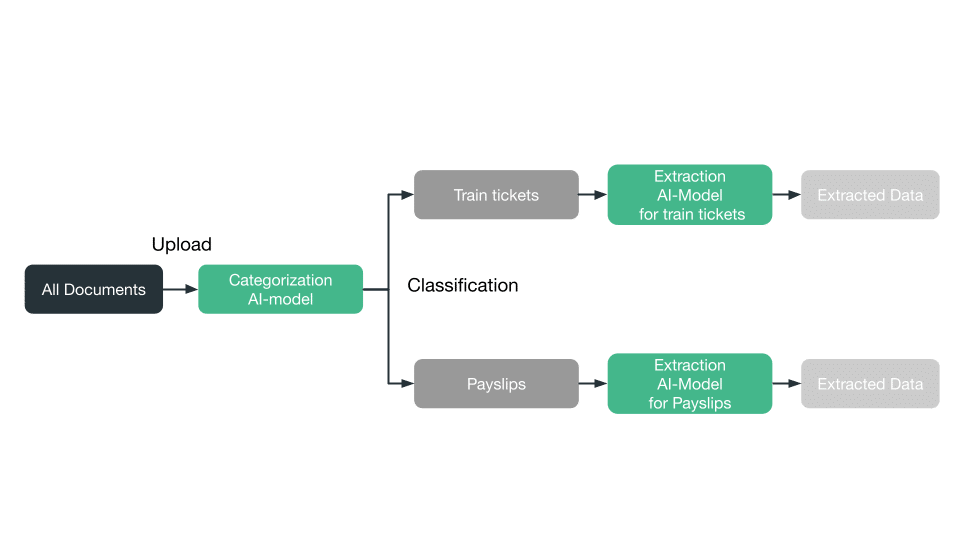
Here is a graphical representation of the concept. Our goal is to create a project in which we can upload all documents (both invoices and payslips). Here, a categorization model should first divide the documents into their document types (categorize). Depending on the category to which a document has been assigned, a corresponding extraction model is then applied to read out the data contained in the document.
Train Categorization and Extraction in one Project#
In this section, you will learn how to define and customize your AI model for categorization and extraction.
* Use the multi Label Set option when creating the Label Set.
How such a project has to be structured, you can see in the two graphics above. Compare it also with the concept from figure 1. For categorization, you need (at least) two default Label Sets that correspond to the categories (here dark green). Further Label Sets, like here for invoices, can be added (light green), but they are only used for extraction. Labels (grey) can be added to default Label Sets as well as to additional Label Sets.
Define categorization#
To define a category, click on HOME > Categories > Add Category+. Give your category a name, select your project and then save via “Save”. For example, if you want to edit payslips and train tickets in your project, define the categories “Payslip” and “Invoice”.
Assign categorization#
After you have defined categories, click Documents. As soon as the OCR process is finished after the upload, you can select the corresponding category for each document in the Category column in this view. The categories displayed in the dropdown selection correspond to the previously created default Label Sets. Then click on “Save” to save the selection. We assign the category “Invoice” to all train tickets and the category “Payslip” to all payslips and then click on “Save”.
Define extraction#
You can define different extractions for the previously created categories. Have a look in the other tutorial.
Important: To define different extraction models for the different categories, the Label Sets created for the data
extraction must be assigned to the categories. The assignment is done when creating the Label Sets. Select the default
Label Set that you created for the categorization as the default Label Set.
For example, if you want to extract information from documents in the Payslip category, assign all Label Sets defined for
the extraction to the default Label Set “Payslip”.
Train AI models#
After this section, you can divide your documents into training and test data and train your AI model to meet your individual requirements.
Train categorization model#
After you have assigned each document to the appropriate category, you can begin retraining the categorization model.
To start the retraining, click HOME>Projects. Find your AI project and
mark it with a checkmark. In the action tab, select “Retrain category ai model” and click “Go”. A banner will appear
that says “AI model re-training has been started. This may take up to 24 hours.” appears. In a small AI project, it
should be trained after just a few minutes. Once training is complete, you will receive an email notification.
Retraining is only possible if at least two categories have been created and documents have actually been assigned to
these categories.
Train extraction model#
How to train your extraction model and what you should pay attention to can be found in our documentation on the data extraction from invoices.
Pay particular attention to the following steps:
Check data
Training and test data
Start retraining
Evaluate results
Adjust AI model#
After you have trained your AI model as described above, you can start adjusting the AI to increase the accuracy of your model. At least 10 additional documents per category are required for the adjustment.
Each adjustment process improves the accuracy of your model. Therefore, you should regularly adjust your AI model with new documents even in productive use.
Upload more documents#
To upload additional documents, click on DOCUMENTS. Via Drag&Drop or the browser window, you can upload files to your project.
Adjust categorization model#
Click on Documents. As soon as the OCR process is finished after the upload, the corresponding category for each document is displayed in the Category column in this view. Check if the category was recognized correctly. If not, select the correct category from the drop-down menu and then click Save to save the selection.
Adjust extraction model#
You can find out how to adjust your extraction model in our documentation on the data extraction from invoices.
Use AI model#
After you have adjusted your AI model, you can use it in productive use. Start with the Upload of newDocuments.