Receipts#
To extract data from receipts quickly and easily, Konfuzio’s AI is the optimal tool. This article will guide you through the procedure to extract data from receipts.
Preparations#
Use web log-in or register for free.
Test the compatibility of your browser.
Have at least 7 invoices ready that you want to readout. Supported file types are: PDF, PNG, JPG, XLSX, DOCX, PPTX
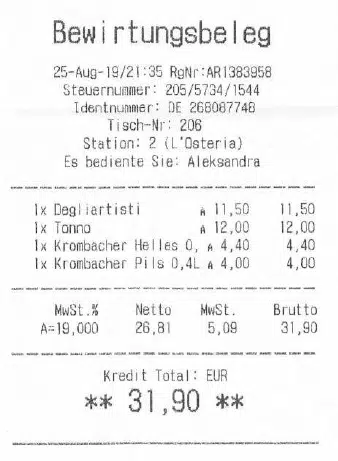
Example of a receipt
Create project#
Click HOME>Projects>Add Project + to create a new AI project. Name your project. In our example, it is called “Receipt”. Save the project via “Save”.

Create project
Add user (optional)#
It is possible to edit a project with multiple users. To add additional users to a project, click HOME>Project Invitations>Add+. Next, enter the email address of the user you want to add and select a project.
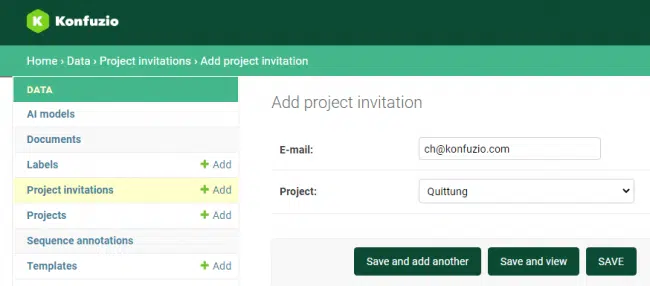
Add user
Upload receipts#
To upload receipts, click on DOCUMENTS. Via Drag&Drop or the browser window, you can upload your local files here. After all uploaded documents light up green, click the reload button to reload the page. Now the OCR process begins. Depending on the file size and number of documents, this may take a moment.
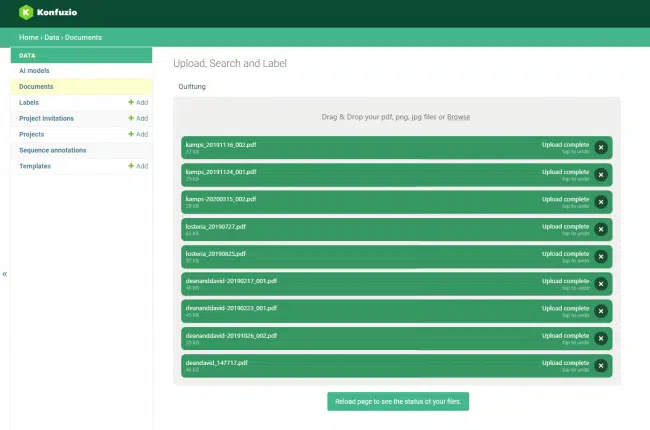
Upload receipts
Define AI model#
In this section, you will learn how to define your AI model and adapt it to your individual requirements.
Define posting information#
After this section, you can define the information you want to extract, for example, the gross amount to extract from receipts. The described procedure can also be used for other information (e.g. date, currency, receipt number, tip, time).
To start, click on HOME>Label Set. Now click on the Label Set that has the name of your project (Here: “Receipt”).
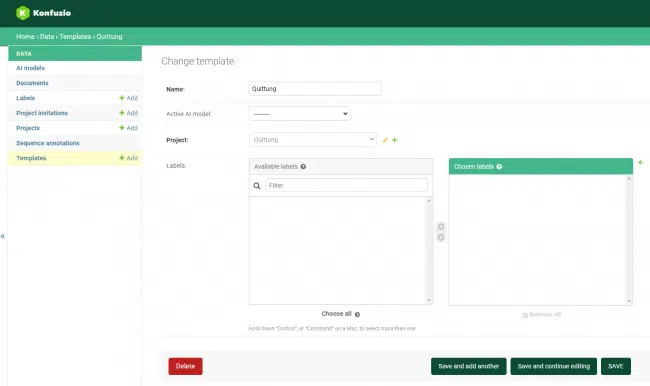
Create Label Set
Click on the green plus next to the “Chosen Labels” field. In the window that now opens, you can specify the booking information that your AI model should extract from the receipts (e.g. gross amount). In the “Project” tab, select your project (Here: Receipt). Use the “Description” field to enter a short description of the booking information. This can be especially helpful for more extensive projects or if the booking information is not clearly named (e.g. date as invoice date, delivery date or service date). Then click on “Save” to save.
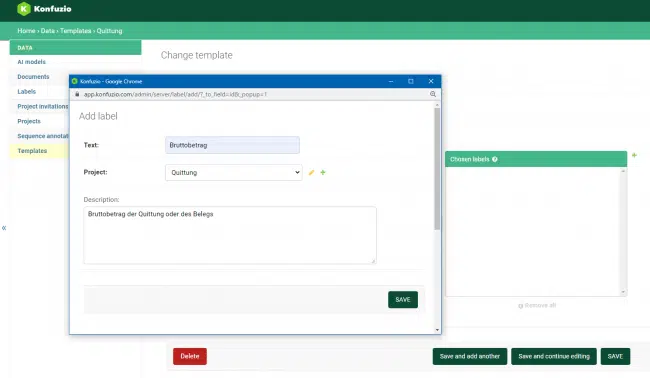
Create labels
We recommend adding “date”, “currency”, “receipt number”, “time” and “tip” in addition to the gross amount in this step. Proceed as described above.
LABEL |
LABEL-SET |
DESCRIPTION |
|---|---|---|
Gross amount |
Receipt |
The total amount of the receipt including VAT |
Receipt date |
Receipt |
Date on which the receipt was issued |
Currency |
Receipt |
Currency unit of the receipt amounts shown |
Receipt number |
Receipt |
Character string that uniquely identifies the receipt. |
Time |
Receipt |
Date on which the receipt was issued |
Tip |
Receipt |
Amount of money paid in addition to the actual price |
Definition of the labels
Assign posting information#
Click on DOCUMENTS. As soon as the OCR process is finished after the upload, you will see the button “SmartView” in this view for each uploaded receipt. Now click on this button.

Document view
In this view, you can select the booking information in the receipt (e.g. gross amount) by clicking on it. As soon as you click on it, the background turns green. Now you assign the concrete gross amount of the receipt (here: 31.90 Euro) to the gross amount. To do this, use the annotation column on the right side. Select your project in the first tab ( here: “Receipt”) and the posting information in the second tab (here: “Gross amount”). In this context, also check whether the AI has correctly recognized the individual characters (e.g. commas and special characters). Then click on “ Save”.
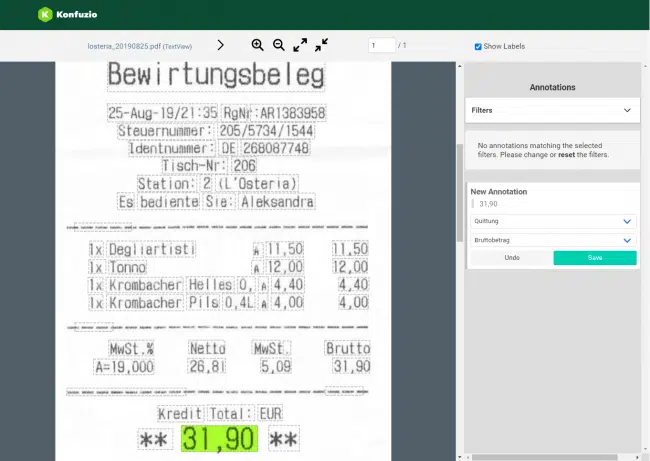
Select gross amount
Define receipt items (optional)#
After this section, you can define information in the individual receipt items, such as the quantity, product name, and unit price of the items for later selection.
To define receipt items, click HOME>Label Set>+Add. Name your Label Set (Here: “Individual services”). Select the corresponding project in the “Default Label Set” tab (Here: “ Receipt”) . Activate the tick box “Has multiple Sections”.
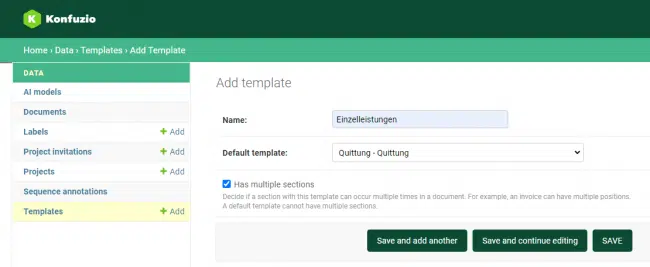
Create Label Set single service
Click on “Save and continue editing” to proceed to the next step.
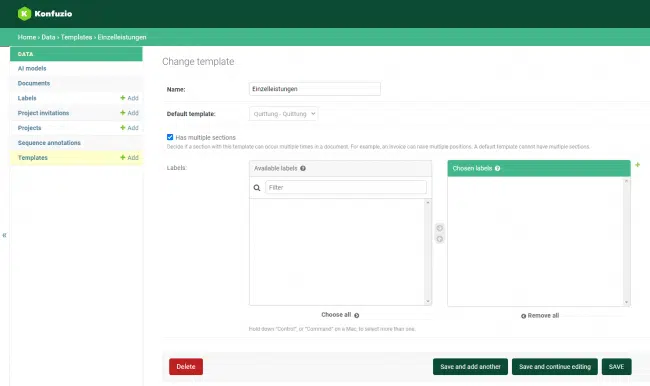
Create labels
Click the green plus next to the Chosen Labels field. In the window that opens, you can specify the components of the receipt items that your AI model should extract from your receipts (e.g. quantity, product name, unit price, VAT code, subtotal). In the “Project” tab, select your project (Here: Receipt). Use the “Description” field to enter a short description of the booking information. This can be especially helpful for large projects or if the booking information is not clearly named (e.g. “Date” as invoice date, delivery date or service date). Then click on “Save” to save.

Add labels to Label Set
In this step, we recommend adding “product name”, “unit price”, “VAT code” and “Subtotal” in addition to “quantity”. Proceed as described above.
LABEL |
LABEL-SETS |
DESCRIPTION |
|---|---|---|
Quantity |
Individual services |
Quantity of the product of one invoice item |
Product name |
Individual services |
Product name or service description |
Unit price |
Individual services |
Gross price for a unit of measure of a product/service |
VAT code |
Individual services |
Marking for the VAT rate applied |
Subtotal |
Individual services |
Gross price as product of quantity and unit price of one invoice item |
Definition of the labels
Assign receipt items#
Click on DOCUMENTS. As soon as the OCR process is finished after the upload, you will see the button “SmartView” in this view for each uploaded receipt. Now click on this button.

Document view
In this view you can now select the components of the line items (e.g. quantity, product name, unit price) by clicking on them. As soon as you click on it, the background turns green. Select the quantity. Now select “Individual services ( new)” in the upper tab of the annotation column and “quantity” in the lower tab. In this context, also check whether the AI has correctly recognized the individual characters (e.g. commas and special characters). Click on “Save” to confirm.
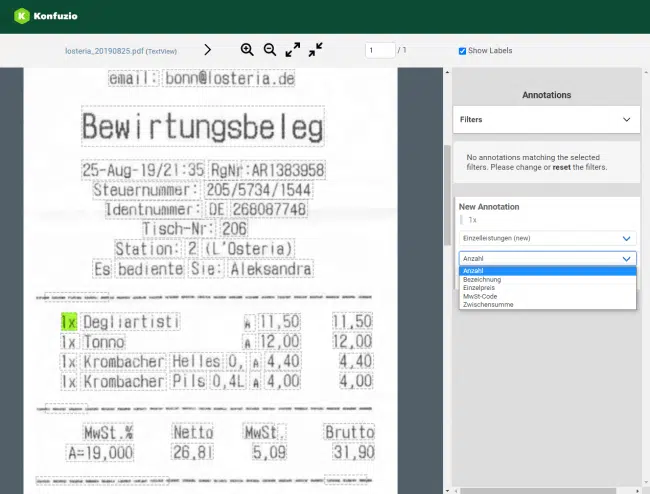
Add quantity to the first receipt item
Repeat this step for the remaining components of the first line item of the receipt (Here: “product name”, “VAT code”, “ unit price”, “subtotal”).
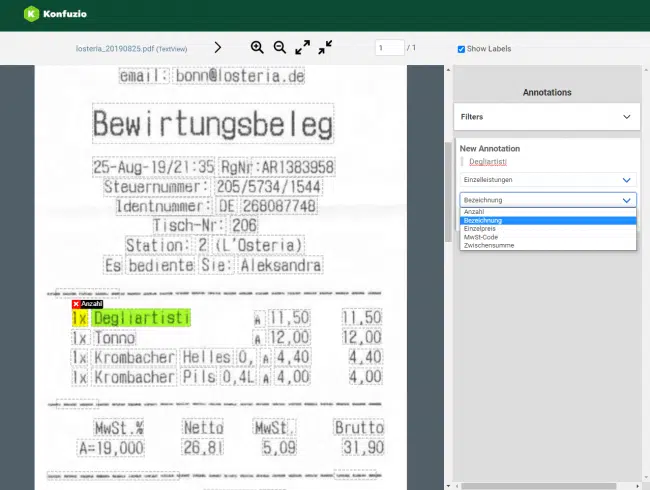
Add product name to the first receipt item
To correctly assign the quantity of the second line item, we create another line item using the annotation column. First, select the quantity of the second receipt item. Now select “receipt item (new)” in the upper tab of the annotation column and “quantity” in the lower tab. In this context, also check whether the AI has correctly recognized the individual characters (e.g. commas and special characters). Click on “Save” to confirm.
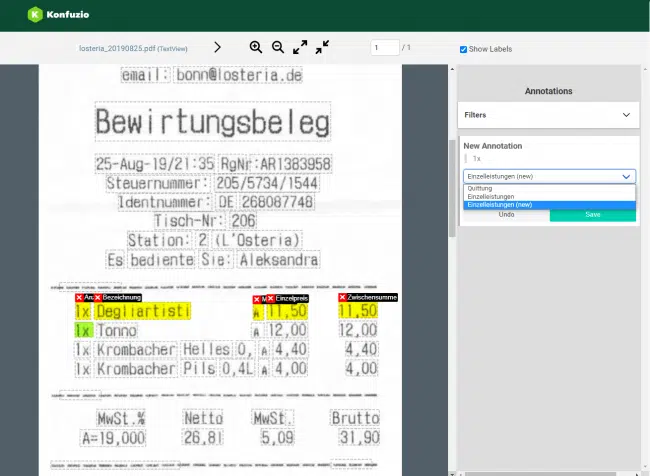
Add quantity to the second receipt item
Repeat this step for the remaining components of the second receipt item (Here: “product name”, “VAT code”, “unit price” , “subtotal”).
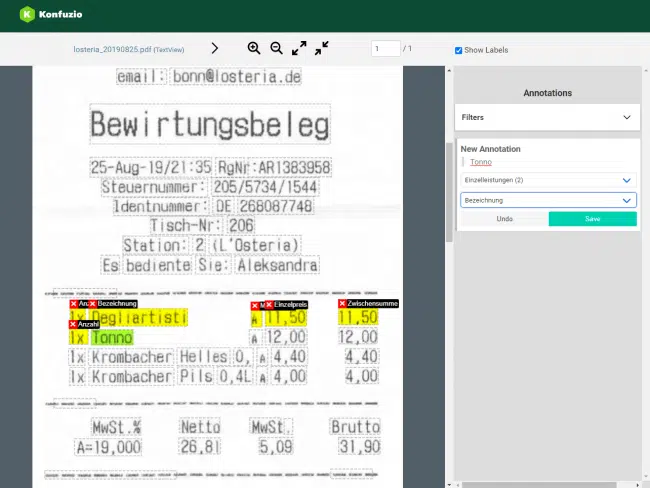
Add product name to the second receipt item
Repeat the procedure until you have selected all the line items of a receipt.
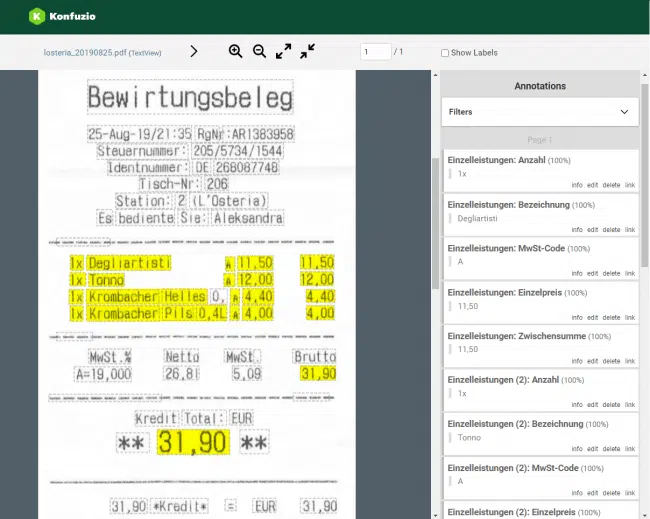
All receipt items marked
Now repeat this procedure for all further receipts.
Train AI model#
After this section, you can divide your documents into training and test data and train your AI model to meet your individual requirements.
Check data#
Before you start training, you should check your training and test data. You can find an overview of what you should pay attention to here.
Procedure |
Incorrect |
Correct |
|---|---|---|
Currency sign |
If only one amount is marked with the currency sign |
If none or all amounts are marked with the currency sign |
Receipt date |
Use of “date” for delivery date and due date |
Use of “delivery date” and “due date |
Frequency of a label |
“Date” marked in only one receipt |
“Date” marked in several receipts |
Number of test and training data in productive use |
10 receipts\ |
|
of which 50% test data and 50% training data |
> 100 receipts\ |
|
of which 30% test data and 70% training data |
Check data
Training and test data#
After you have checked your data, it is divided into training data and test data. The allocation is done in the document view.
To get to the document view, click on DOCUMENTS. In this view, you can check the box to the left of each file name to select the receipts. Select the action “Add to training data set” in the action tab and click on “Go”. Then select the test data and choose the action “Add to test data set” in the action tab and click on “Go”.
As a rule of thumb, assign 30 % of receipts to test data and 70 % to training data.

training data
Start retraining#
To start the retraining, click HOME>Projects. Find your AI project and mark it with a checkmark. In the Action tab, select “Retrain AI model” and click “Go”. A banner with the words “AI model re-training was started. This may take up to 24 hours.” appears. A small AI project like this example project should be trained after just a few minutes. Once the training is complete, you will receive an email notification.
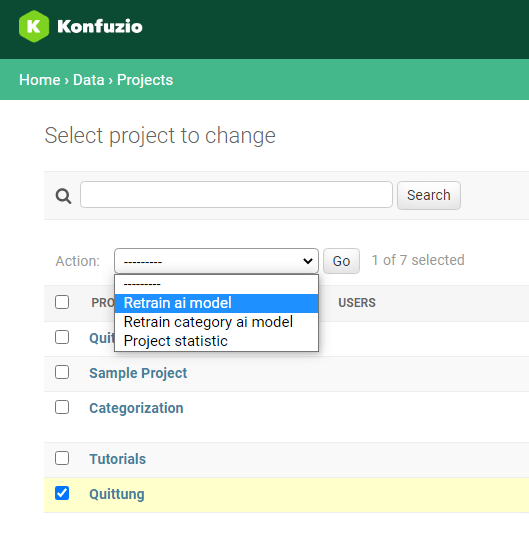
Initiate training
Evaluate results#
To check if the retraining is complete and how good the data extraction results are, click HOME>AI models. In this view, you will find your AI model. In the column “Status” you can see whether the retraining is finished or still in process. As soon as the status “Training finished” is displayed, you will find the quantitative evaluation of your AI model in the following columns.

Evaluation
How to properly classify the evaluation and what the figures mean can be found in the Key Features under AI Model.
Adjust AI model#
After you have trained your AI model to extract data from receipts as described previously, you can start adjusting the AI to increase the accuracy of your model. At least 10 more calculations are required for adjustment.
Each adjustment process improves the accuracy of your model. Therefore, you should regularly adjust your AI model with new documents even in productive use.
Upload receipts#
To upload additional receipts, click on DOCUMENTS. Via Drag&Drop or the browser window, you can upload files to your project.
Posting Information#
Once the OCR process is complete, you will see the amount of booking information recognized by the AI in the “Feedback required” column of each receipt. Now click on “SmartView” to check and edit them.

Feedback required
In this view, you can revise the booking information recognized by the AI. The booking information highlighted in yellow in the receipt has been recognized by the AI. Confirm correctly recognized booking information by clicking on the green tick. Reject the incorrect ones by deleting them with the red “X”. In this context, also check whether the AI has correctly recognized the individual characters (e.g. special characters). You can use the annotation column on the right side for this purpose. To edit incorrectly recognized or incorrectly assigned booking information, click on “edit” in the annotation column and correct the errors. Then click “Save” to confirm.
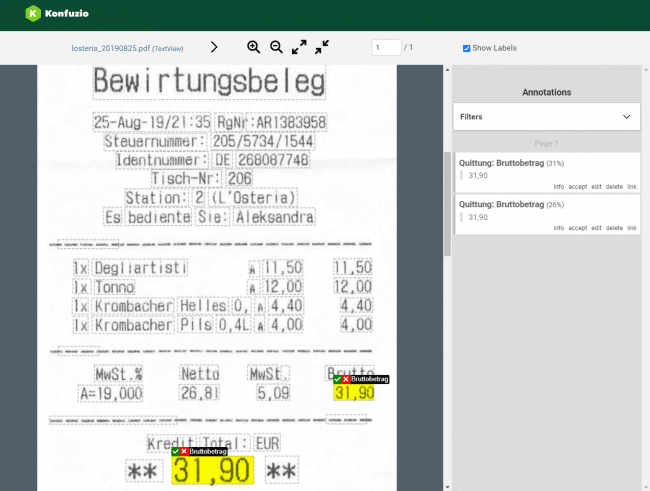
Give feedback
If posting information (e.g. gross amount) was not recognized in the receipt, click on the corresponding posting information in the receipt. It will then turn green. Now you can assign it. To do this, use the annotation column on the right side of the Smart View. In this context, also check whether the AI has correctly recognized the individual characters (for example, commas and special characters). Select “Receipt” in the upper tab of the annotation column and the booking information (here: “Gross amount”) in the lower tab. Then click on “Save”.

Add gross amount
Receipt item#
The line items highlighted in yellow in the receipt have been recognized by the AI. Confirm correctly recognized line items by clicking on the green tick. Reject the incorrect ones by deleting them with the red “X”. In this context, also check whether the AI has assigned the individual components (e.g. quantity, product name, unit price, VAT code, subtotal) to the correct line items. To do this, you can use the annotation bar on the right. To edit incorrectly identified or incorrectly assigned line items, click on “edit” in the annotation bar and correct the errors. Then click on “Save” to confirm.
Check receipt items with filter#
In order to keep the overview, it is recommended to use filters. To do this, select a line item of the receipts in the top right of the annotation bar under “Filter” in the “Sections” tab (here: “Individual service 2”). Now only the components of the second line item should be visible. If you see an error, you can use “edit” in the annotation bar to fix it. You can also filter the individual components of the receipt items (e.g. quantity, product name, unit price, VAT code, subtotal) in the “Label” tab.
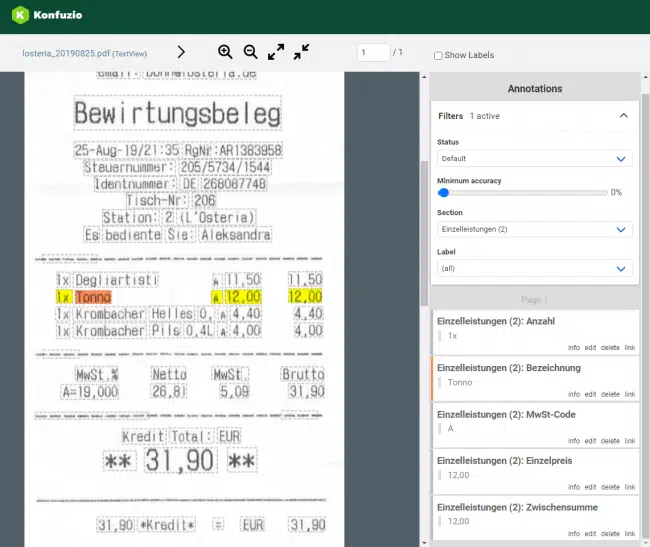
Use filters
Extend training data#
After you have verified the posting information and receipt items recognized by the AI in all receipts, you can add the receipts to the training data and initiate retraining. This will increase the accuracy of your AI model. Before you trigger retraining again, be sure to check your training and test data.
Use AI model#
After you have adjusted your AI model, you can use it in productive use.
Start with
the upload of new receipts.
Export results#
To export results, click DOCUMENTS. Select the documents whose data you want to download by ticking them. If you select multiple documents here, they will be combined into one CSV file. Select the action “get all data as a CSV file” in the action tab and click on “go”. The download of the CSV file should start automatically. CSV files can be used with spreadsheet programs such as Microsoft Excel, Google Sheets, etc.
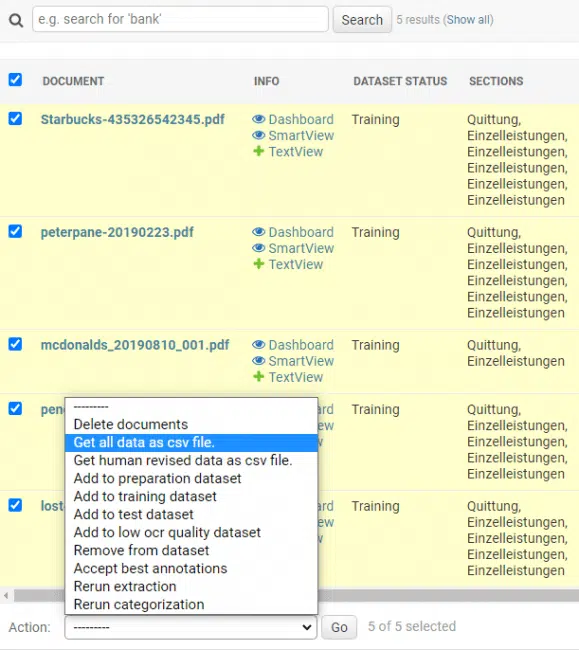
get data as CSV export